Lucky Dog K-9 Cube Growers Blend Soil Review
Nitty Gritty on Soil Blocking
My first twelvemonth of flower farming I was looking for every and any mode to accomplish four goals:
1) Abound amazing and salubrious flowers
2) Abound flowers on a super tight budget
3) Save space
iv) Add to the earth's health, not deplete it.
1 of the means I felt I could achieve all 4 goals was through soil blocking.
Soil blocking, what is this you speak of? Well, it's exactly what it sounds similar. You are making compressed blocks of soil, this is in lieu of using plastic propagation trays. Many propagation trays are flimsy and if non pampered over can easily fissure and deteriorate from UV rays. There are propagation trays that are sturdier and can exist well worth the investment but those can easily run yous $16 per tray! When you are looking at starting thousands of seedlings that cost can skyrocket.
These days at Sierra Blossom Subcontract we have moved from strictly soil blocks to using a mixture of soil blocks and propagation trays. On especially frigid days, filling a tray with potting soil and quickly moving the performance indoors is pleasant and allows more flexibility. Soil blocking has many benefits but that does non mean information technology doesn't come up with some inconveniences. To soil block or not to soil block really comes down to a middle thing forth with budget. Though, I retrieve information technology is an essential tool for every blossom farmer to take in their back pocket of know-hows. With that said, we still take quite a few varieties that nosotros bosom out the soil blockers for that I will list at the end of this post!
Soil blocking was frontiered in the US past Eliot Coleman. He has all kinds of books and videos that go into the benefits of soil blocking. He is pretty incredible, if you would like to learn more about organic and sustainable gardening his books are crawly and Youtube videos even more so!
Compressing soil into a little brick sounds counterintuitive to utilise for little seedling roots. I would hold. That is why yous don't use whatever-plain-'ol potting soil, there are specific soil mixes you tin can purchase or recipes to make your own. The principal difference between seed starting mix and soil blocking mix is the corporeality of perlite. In soil blocking, you need a lot of perlite. The soil volition non be fluffy, in order for the tender young roots to abound and for some oxygen to be in the soil to prevent an anaerobic surround that can pb to disease: perlite is a must. This will permit the soil to drain and those tiny roots to penetrate the soil block and thrive.

Benefits to soil blocking:
1) Economical: not needing to reinvest in seedling trays. The initial investment in soil blockers tin be quite a bit but if yous are starting a lot of seeds year after yr they will return your investment! Snag some cafeteria trays from a local restaurant supply store and you are set.
2) Lessened transplant shock: Fifty-fifty plants that typically exercise non practice well transplanted can thrive with a soil block. The thought is that the roots are pruned by the air. One time the roots hit the air, they stop growing, until the plants are transplanted into the garden or bumped up to the adjacent size soil block. This inhibits the plant to become root-jump (which most varieties are sensitive to becoming root bound). By the plant not being root leap, when time to transplant, they the roots aren't needing to be tampered with. This lessens transplant shock that will allow your plants to non skip a beat, they won't be sorry and volition but continue to thrive whereas transplanting from propagation trays may set the plant's growth dorsum a few days to even a few weeks!
iii) Storage: information technology doesn't take much space to shop a couple soil blockers and some trays! If you alive in a small house, storing tons and tons of seedling trays may exist overwhelming. If you lot are limited on space for storing trays, you most probable are also limited on shelf space in the greenhouse. You can fit a lot more tiny soil blocks than the traditional seedling trays. I know in our area, wind can be insane! Nicely organized trays can quickly become scattered all over the one thousand but soil blocks are heavy and won't move an inch. Plus, at plant out fourth dimension you have dramatically less cleanup and trays to sterilize! Likewise, your married man won't go upset that y'all go on stealing butter knives from the kitchen to use to get seedlings out of trays… ask me how I know!
4) More than earth friendly. Flower Farming uses a lot of plastic from greenhouse plastic to row covers to baste tapes. Soil blocks is ane way to lessen the employ of plastic. Many of the affordable propagation trays volition warp in the sun and crevice making information technology lucky to become a skillful year out of i peradventure 2 if y'all are diligent. Soil blockers volition not breakdown in the sun and you tin even opt to skip the plastic in deciding which trays you are using! We have used sometime cookie sheets or as of late have been using biodegradable cafeteria trays with the idea they are used one time and then composted at planting out time.
v) Permit yourself become a child over again: You get to play in the mud! Revisit you childhood and lets get to making mud pies, merely really, they look more like brownie bites... get your kids involved! They volition call up you lot are the best playing in the mud with them!
What you need:
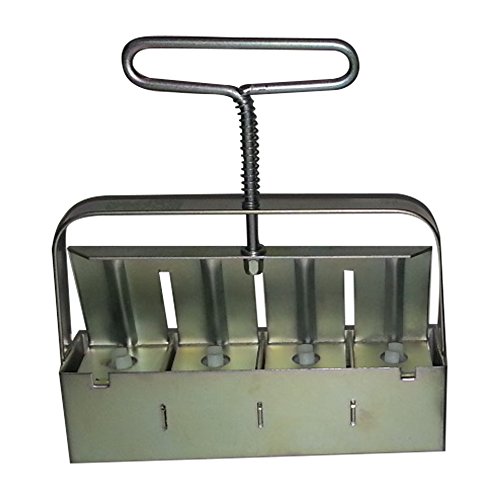
Soil blockers in your desired size
Soil block mix
Trays of some sort (such every bit cafeteria trays or modest cookie sheets)
Dome hat, if using


Purchasing Soil Blockers
First matter you need to do is invest in some soil blockers. I originally purchased mine from Johhny Select Seeds merely plant some with good reviews on Amazon and volition provide the link to those at the lesser of this post . They have many different sizes. I opted for the ¾" soil blocker and the 2" soil blocker. I did wind up getting a bigger size only found that really, the first two were more than sufficient and the larger soil block was non cost effective in the amount of soil needed to make that size. If y'all can only afford one size of soil blocker I propose going with the 3/4".

The soil block-mix
In one case y'all have your soil blockers in hand, information technology's time to get the soil. You can purchase the soil pre made from select vendors. I personally didn't want to pay the crazy aircraft and in my area, at that place was non any soil blocking mix available to purchase locally. If y'all use the normal potting soil your soil blocks volition not get a cake, calculation some compost or additional perlite may help. The get-go yr we used soil blocks we opted to follow Eliot Coleman's soil blocking recipe. We did make a modify in some of the ingredients, based on the availability of what I could observe locally.
These days, I must admit: I take slightly crumbly blocks in lieu of not having to brand my own mix. Using quality potting soil such as Fox Subcontract's Lucky Dog K9 Kube or Sunshine professional mix doesn't make for as stout of a block but information technology's convenient! My making soil blocks using this is to my husband's horror when he sees imperfect soil block simply you know what? They hold up well enough until the roots beginning growing, then the roots hold the blocks together just fine! I'm not looking to be pretty!
Here's the recipe soil cake recipe we used (it makes a ton!):
three (five gallon) buckets of peat moss or coconut coir
2 (five gallon) buckets of perlite
2 (five gallon) buckets of compost
1 (five gallon) bucket of garden soil
ane cup blood repast
1 cup bone meal
one cup forest ash
About the soil ingredients
Choosing the substrate:
Peat moss's sustainability is questionable but it is readily available and affordable. Coconut coir is a more sustainable product simply that comes with a heftier toll tag and may no be every bit easy to come beyond (but information technology'due south becoming more pop!). Peat moss is more acidic where coconut coir is neutral. I've used both and do adopt the coconut coir when I can swing the cost. I find coconut coir holds together slightly amend and isn't as fussy if it dries out. Bonus: I have found kokosnoot coir doesn't grow algae as easily if overwatered or its been cold weather compared to peat moss.
Choosing which one is really a heart and budget thing!
Ya need perlite
The perlite is what will allow drainage and space for the roots to grow. Plus, the girls love slap-up it between their fingers like popcorn! It's rather inexpensive and is an absolute must for soil blocking!
Quality Compost
Oh compost. It'due south simply delicious and vital for plants to thrive. In our surface area, it's non the easiest to observe good quality compost at an affordable rate (I green-eyed the farmer'due south who pay $14 a yard for GORGEOUS rich compost!). We opt to brand our own and only purchase when admittedly necessary. With a total fledge flower farm in swing, why not make our own? The important part for using quality compost is you want information technology to have been properly cooked. The concluding think you demand is a soil block total of viable weed seeds to compete with your seedlings or for un-composted manure to burn them! Y'all also desire the compost fully broken downward, if it is not then there will be some competition between seedling and those united nations-composted materials for nitrogen.
Garden soil
The addition of garden soil may sound alarming, don't seedlings need sterile mix?! Unless you have a known affliction your soil should be rubber. You could also substitute this component with additional compost, if you would prefer.
The reason behind the garden soil is that ideally information technology aides in the stupor of the transplant, that way the niggling plants already have a lilliputian sense of taste of what their eventual domicile will exist. For us, though nosotros did use garden soil in hindsight I would go with more compost. We have clay soil which really made for tiny bricks! If you have healthy, loamy soil and then sure! Go for the garden soil. I would prefer to have salubrious, thriving seedling roots than for them to have a "taste" of their eventual home. Two sides to the coin, experiment and determine which route you lot would prefer to go!
Macronutrients
The blood repast, bone meal and forest ash tin exist supplemented with other amendments, every bit long as the plants become some macro nutritional needs. Some growers prefer not to have fertilizers in the soil for starting seeds, I personally haven't seen a downside and love that I don't need to feed the seedlings for a few weeks, since that's about how long information technology takes for them to gobble up all the good stuff in the soil mix once germinated. Messing effectually with foliar fertilizers on such young plants can exist playing Russian roulette if you lot don't dilute them properly! To larn more well-nigh constitute diet be sure to read my post Nitty Gritty on Constitute Nutrition.

Mixing it up
We toss all the ingredients in the wheelbarrow and mix thoroughly. Then, we add lukewarm water in the ratio of one part h2o to every three parts of mix, adding more water every bit needed. Why warm water? The warm water will activate all the goodies in the soil to make them readily available for the seedlings. Plus, it's common cold and my hands become frozen! Okay a niggling less about my fingers: it will bring the soil temperature closer in range that is needed for the seeds to germinate. Starting off with frigid cold soil temperatures will be more hard to warm upward, offset them off warm to give those seeds a jumpstart!
Soil cake mix needs to be style more moisture than you lot're used to. When seed starting in trays, you want the soil to be damp like a moist sponge. That'southward too dry for soil blocking. At that place is still a balance. If the mix is too wet, it won't become a block. If information technology's too dry, the block will crumble. Information technology'southward very much like Goldilocks and the three bears scenario. Throwing the soil to the side of a shed is a fun way to observe out if you lot have your ratios right, my girls dear this part! If you throw information technology and it runs down, it's too wet. If yous throw it and information technology doesn't stick, it's too dry. If you throw it and the mix stays stuck, it'south just right. After testing the soil, only spray down the side of the shed with a hose. Not into mud flinging? Then eyeball and only try making the soil blocks then adjust accordingly. If the soil mix is too wet, add more soil mix. If the soil mix is too dry, add more water.
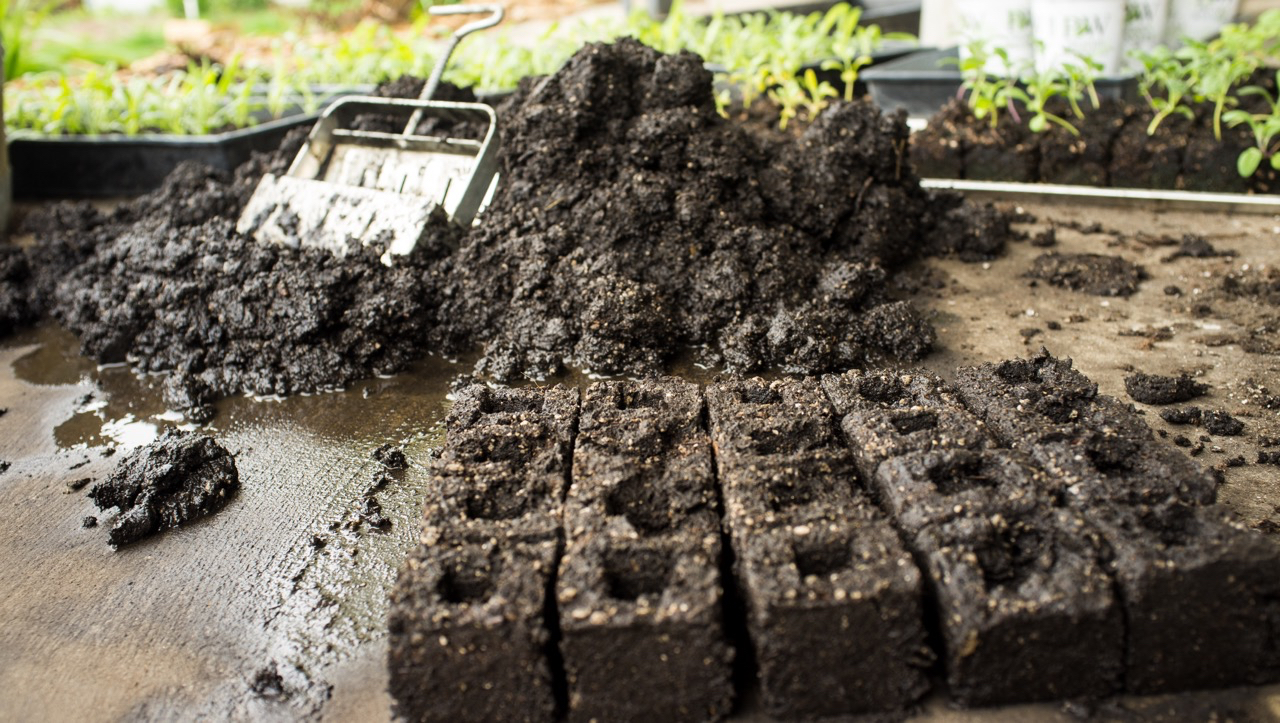
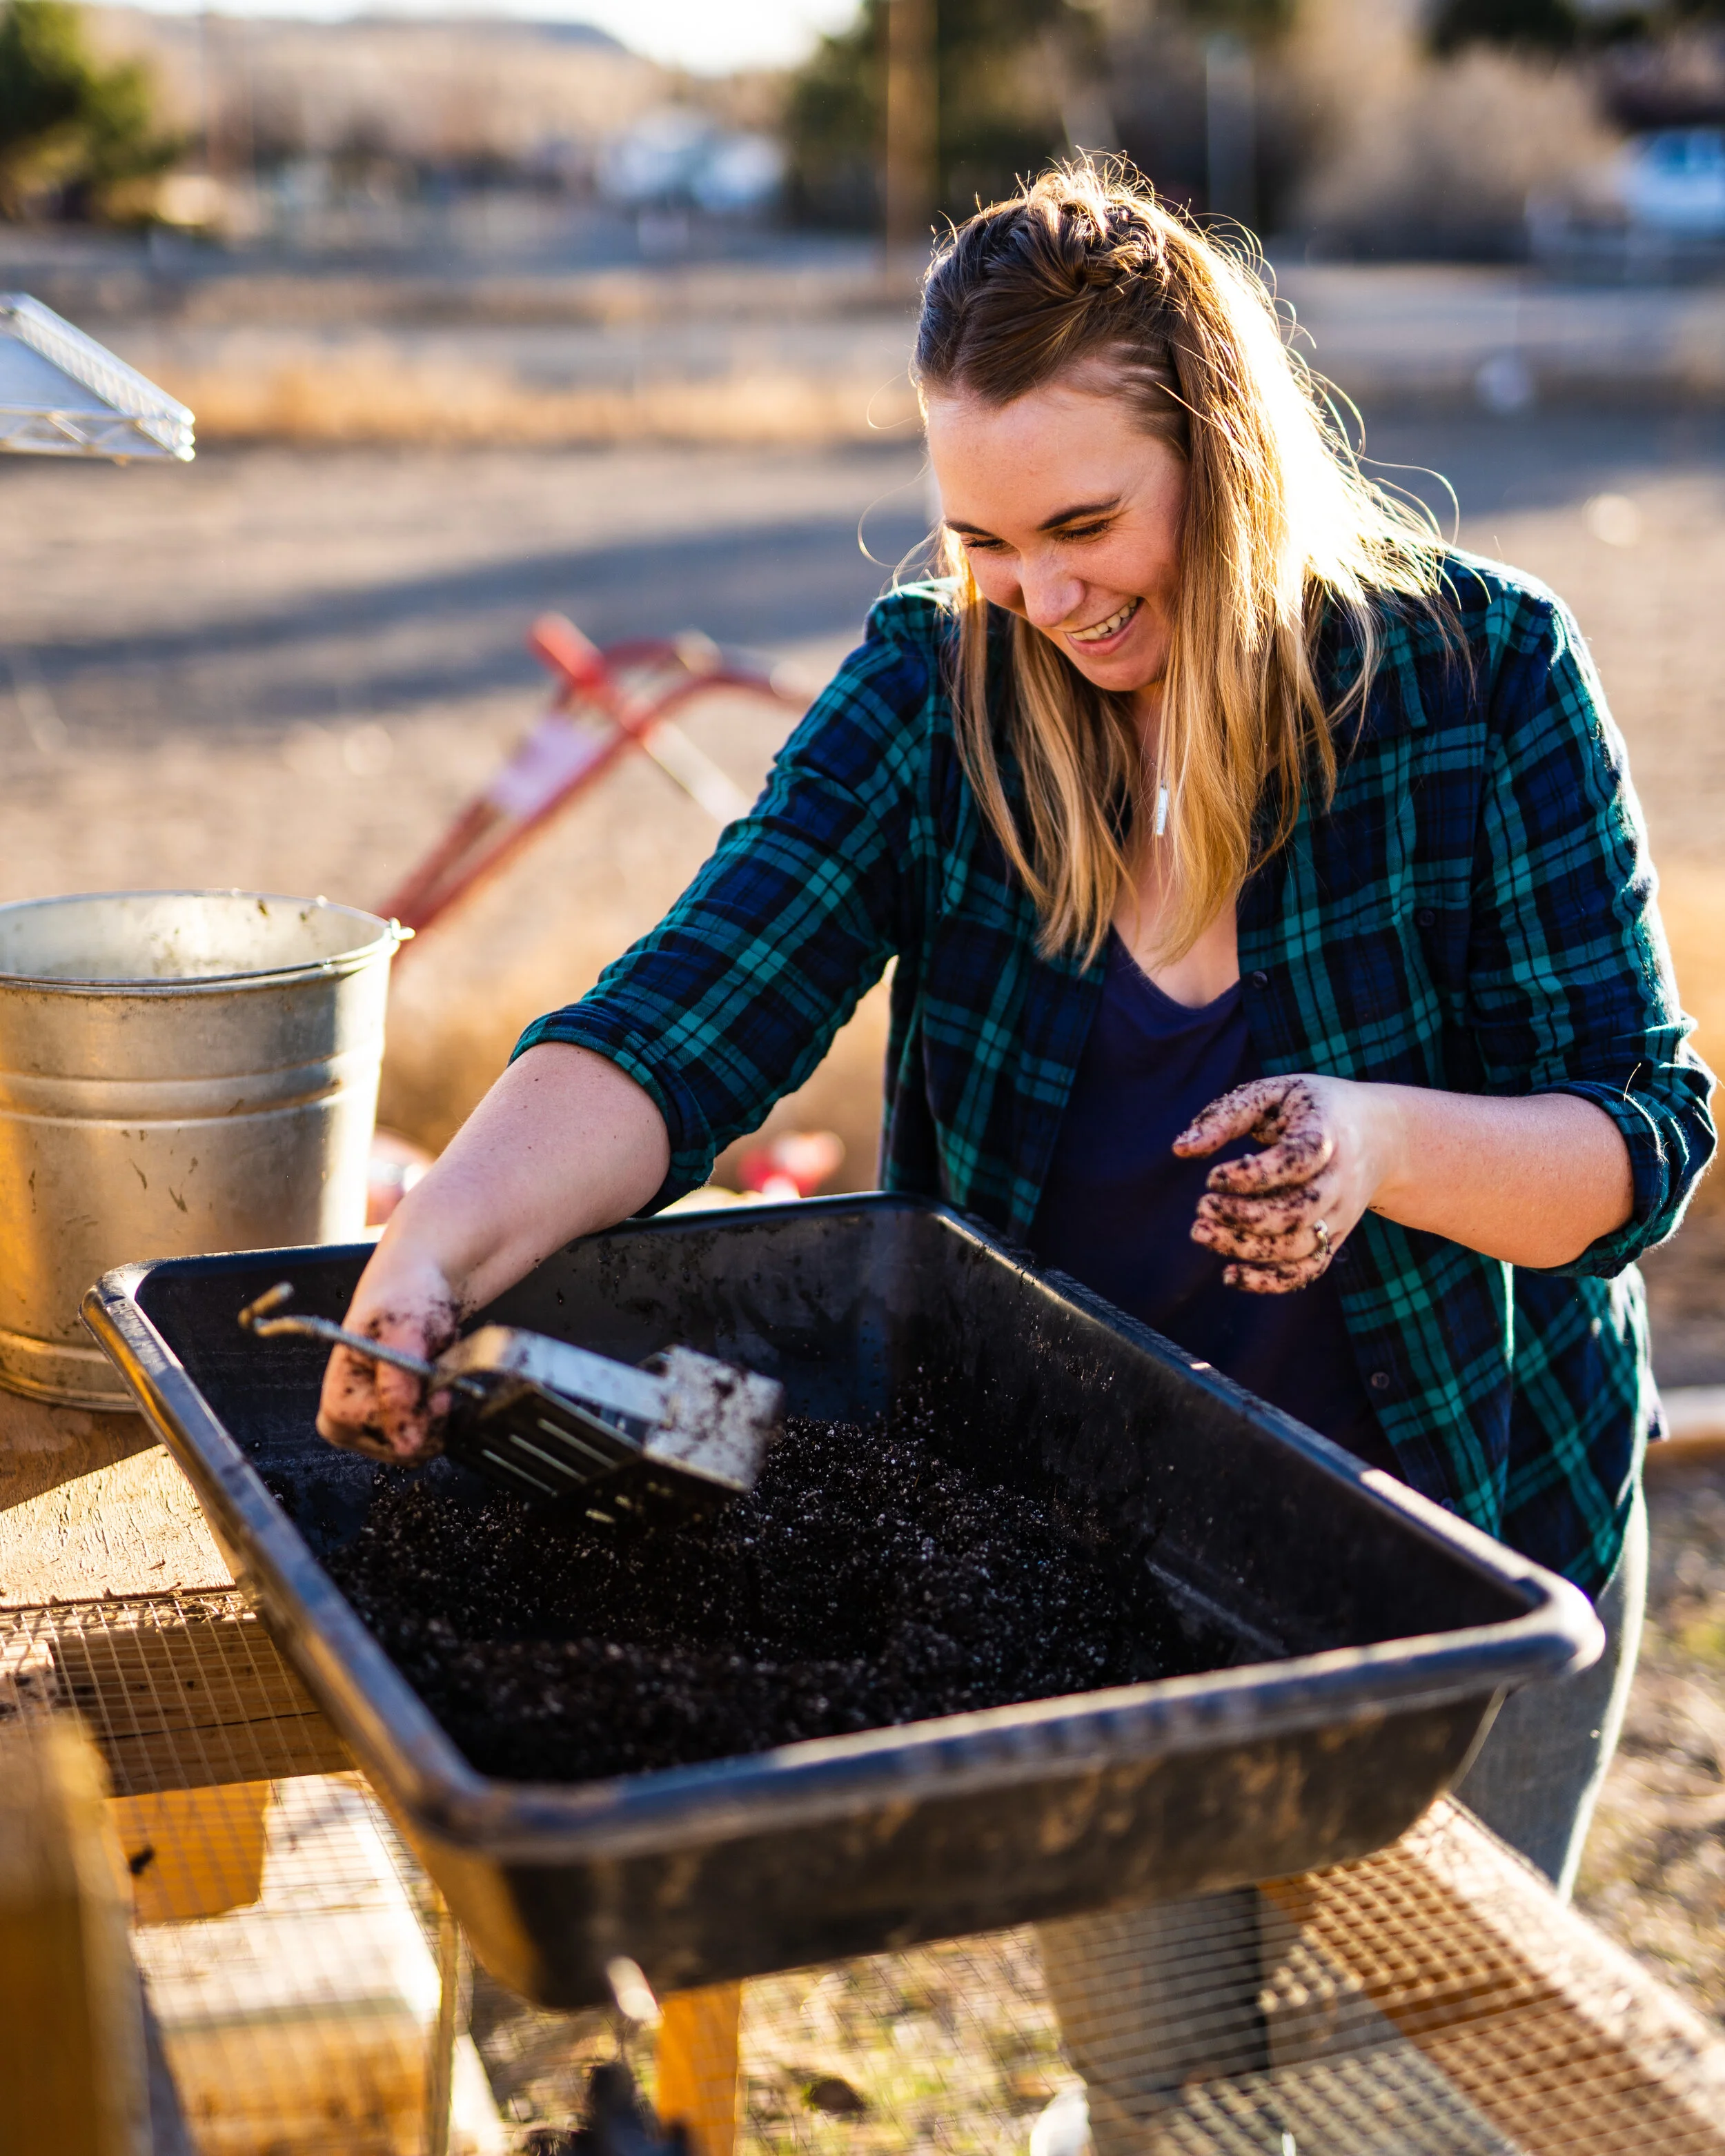
Making blocks
In one case you accept your mix ready, its time to play in the mud! Nosotros have used our cement pad to make a nice pile of the soil for the soil blocker but a high work area will exist much easier on your body! You want the pile to exist about one and a half inches deeper than your soil blocker is high (considering it'due south going to compress!). If the pile is too deep, the bottom of your soil blocks won't exist even. If the pile isn't deep enough, y'all won't have a complete soil block.
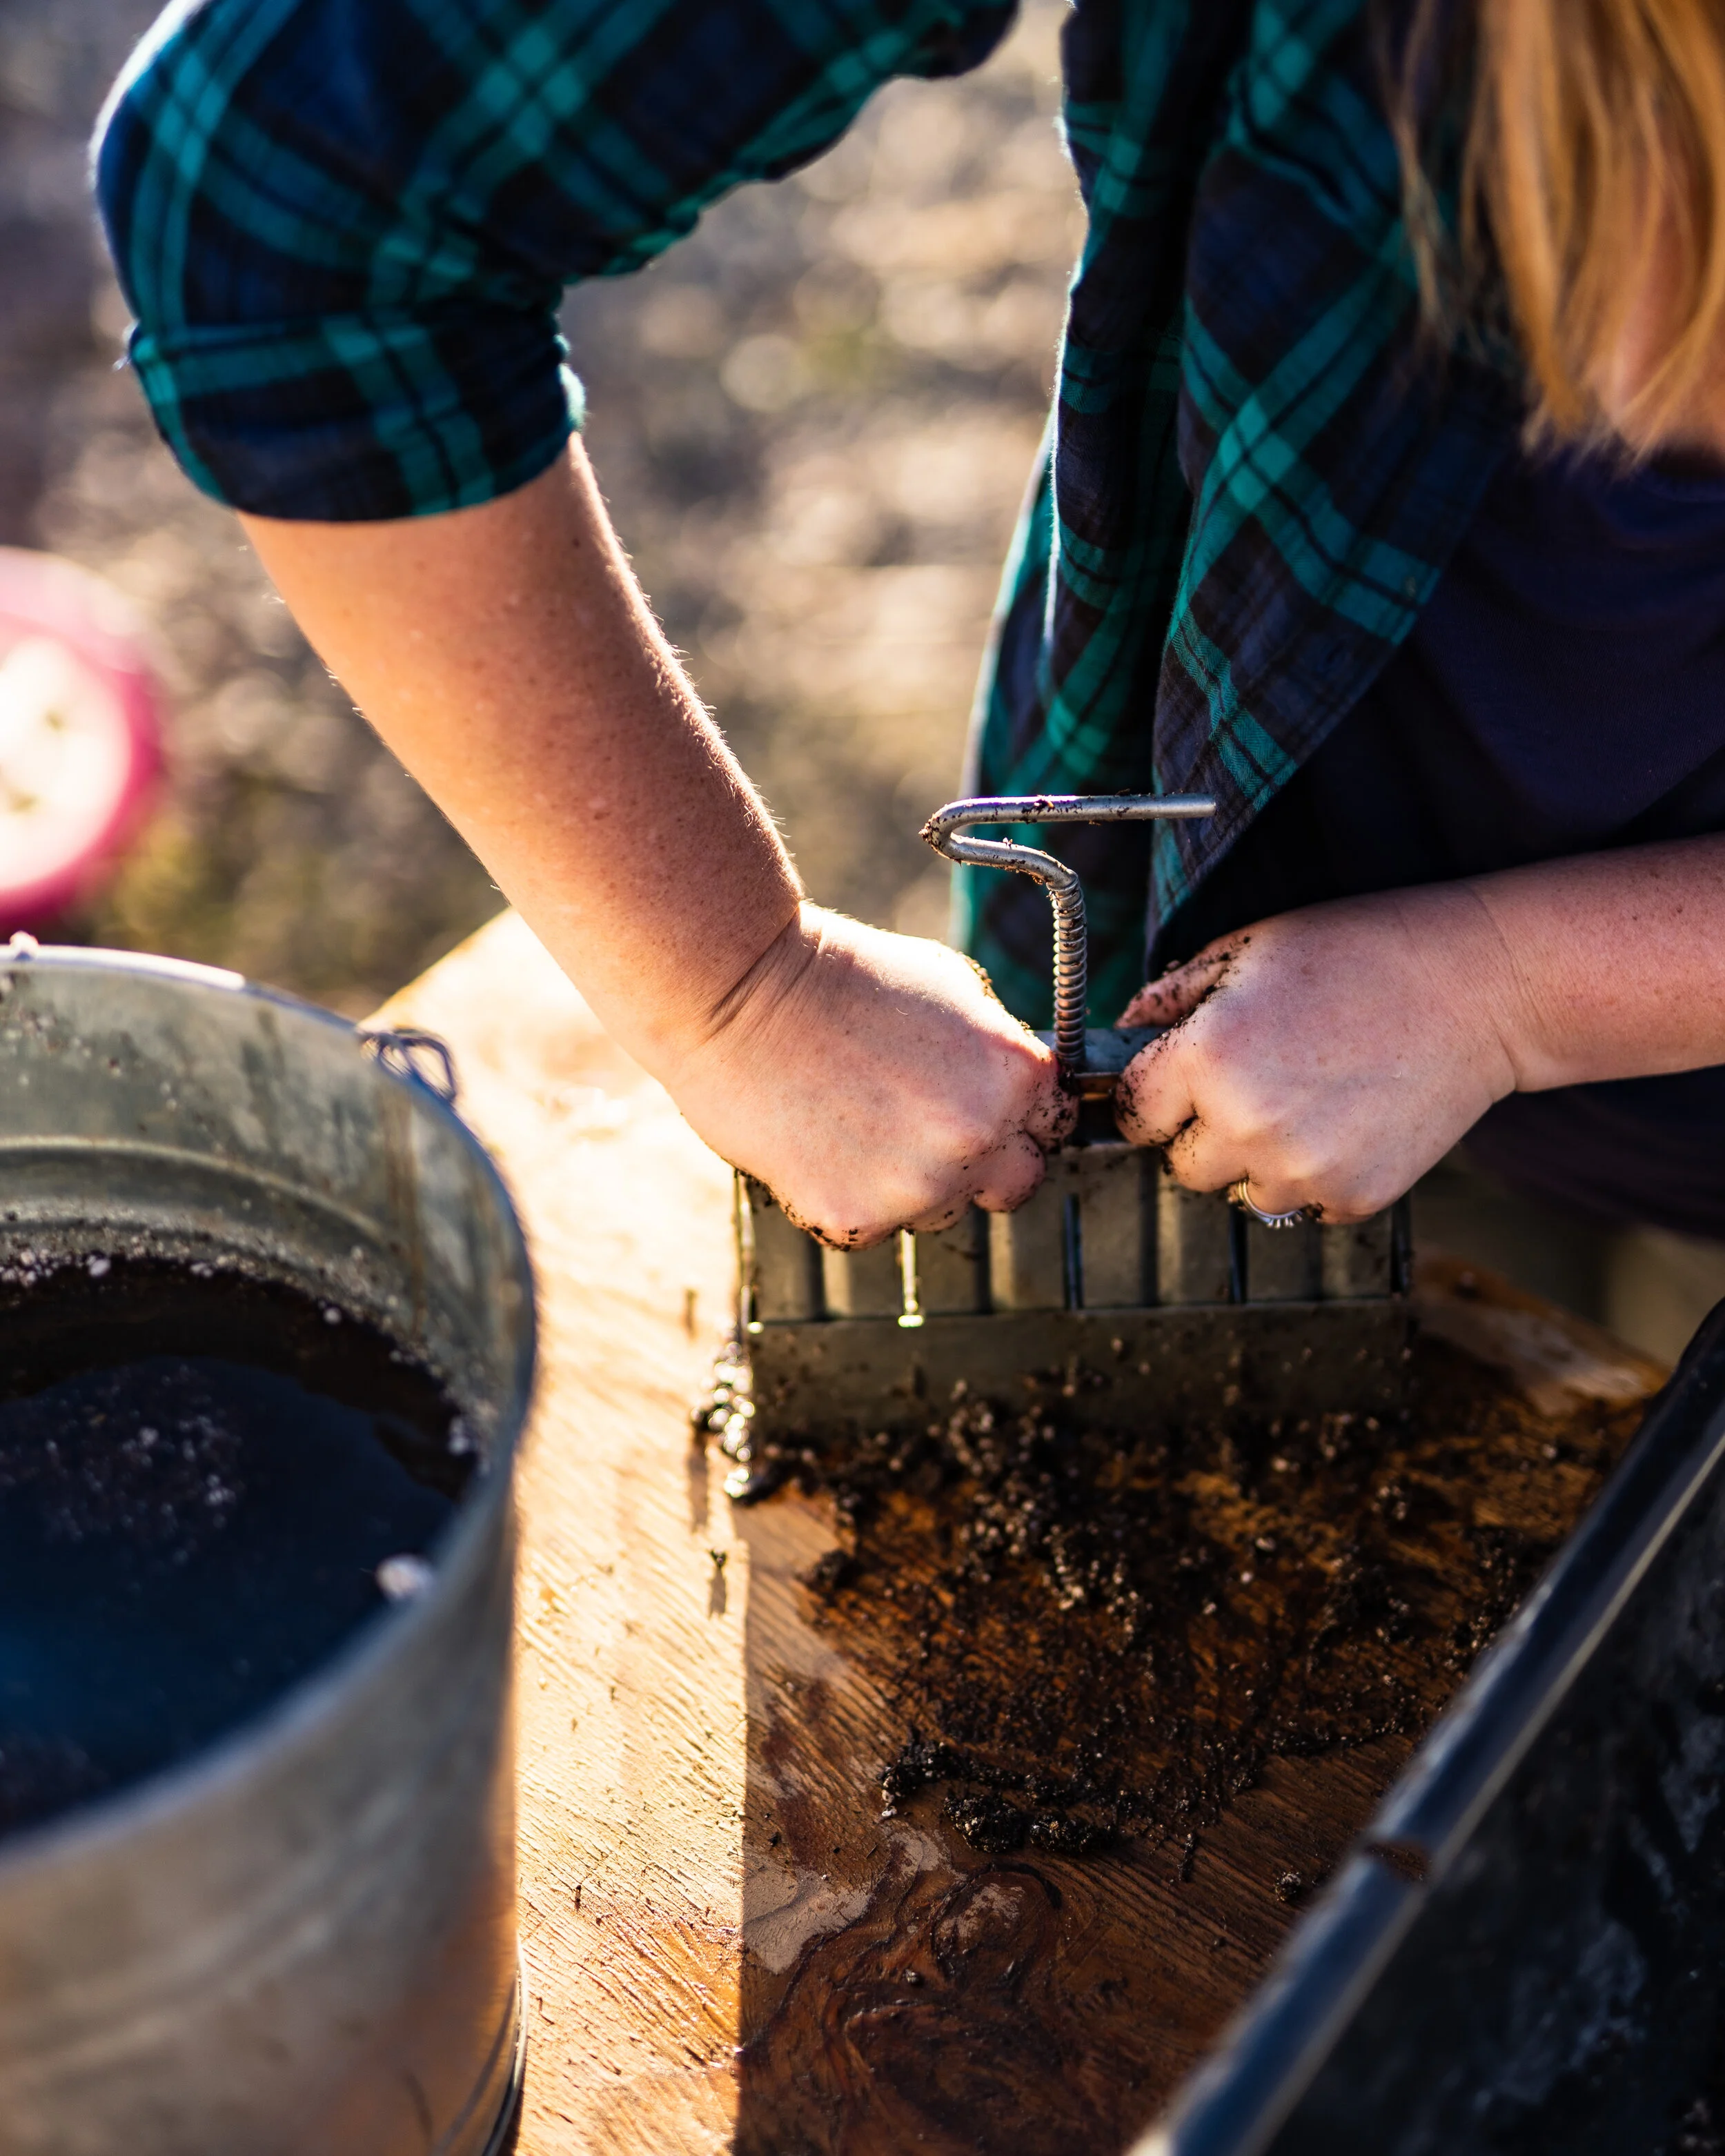
When the pile of mix is ready have your soil blocker, push it down until it hits the footing (or other surface y'all are working on) and twist back and forth. You want to come across water gushing out the tiptop of the soil blocker.
Make sure the soil on the bottom of the soil blocks is fifty-fifty, scrape excess soil if needed to take soil blocks that can sit down flat. Lift the blocker to your tray and push handle to release the soil blocks. Easy peasy. Well, not actually. It takes a fiddling practice but information technology's well worth information technology! Slowly push down on the release in pocket-size bursts until the soil blocks dislodge. Continue a bucket of warm h2o on hand, in between each batch, submerge soil blocker into the water to rinse.
We find the 2" soil blocker makes pretty blocks but the 3/4" is our nearly used! To brand better blocks using the 3/iv" soil block, y'all may discover you need to individually push in the soil for each prison cell to make a consummate soil block. It can get a little boring but these blocks are small plenty that you don't need to be working with incomplete ones!
Using the blocks
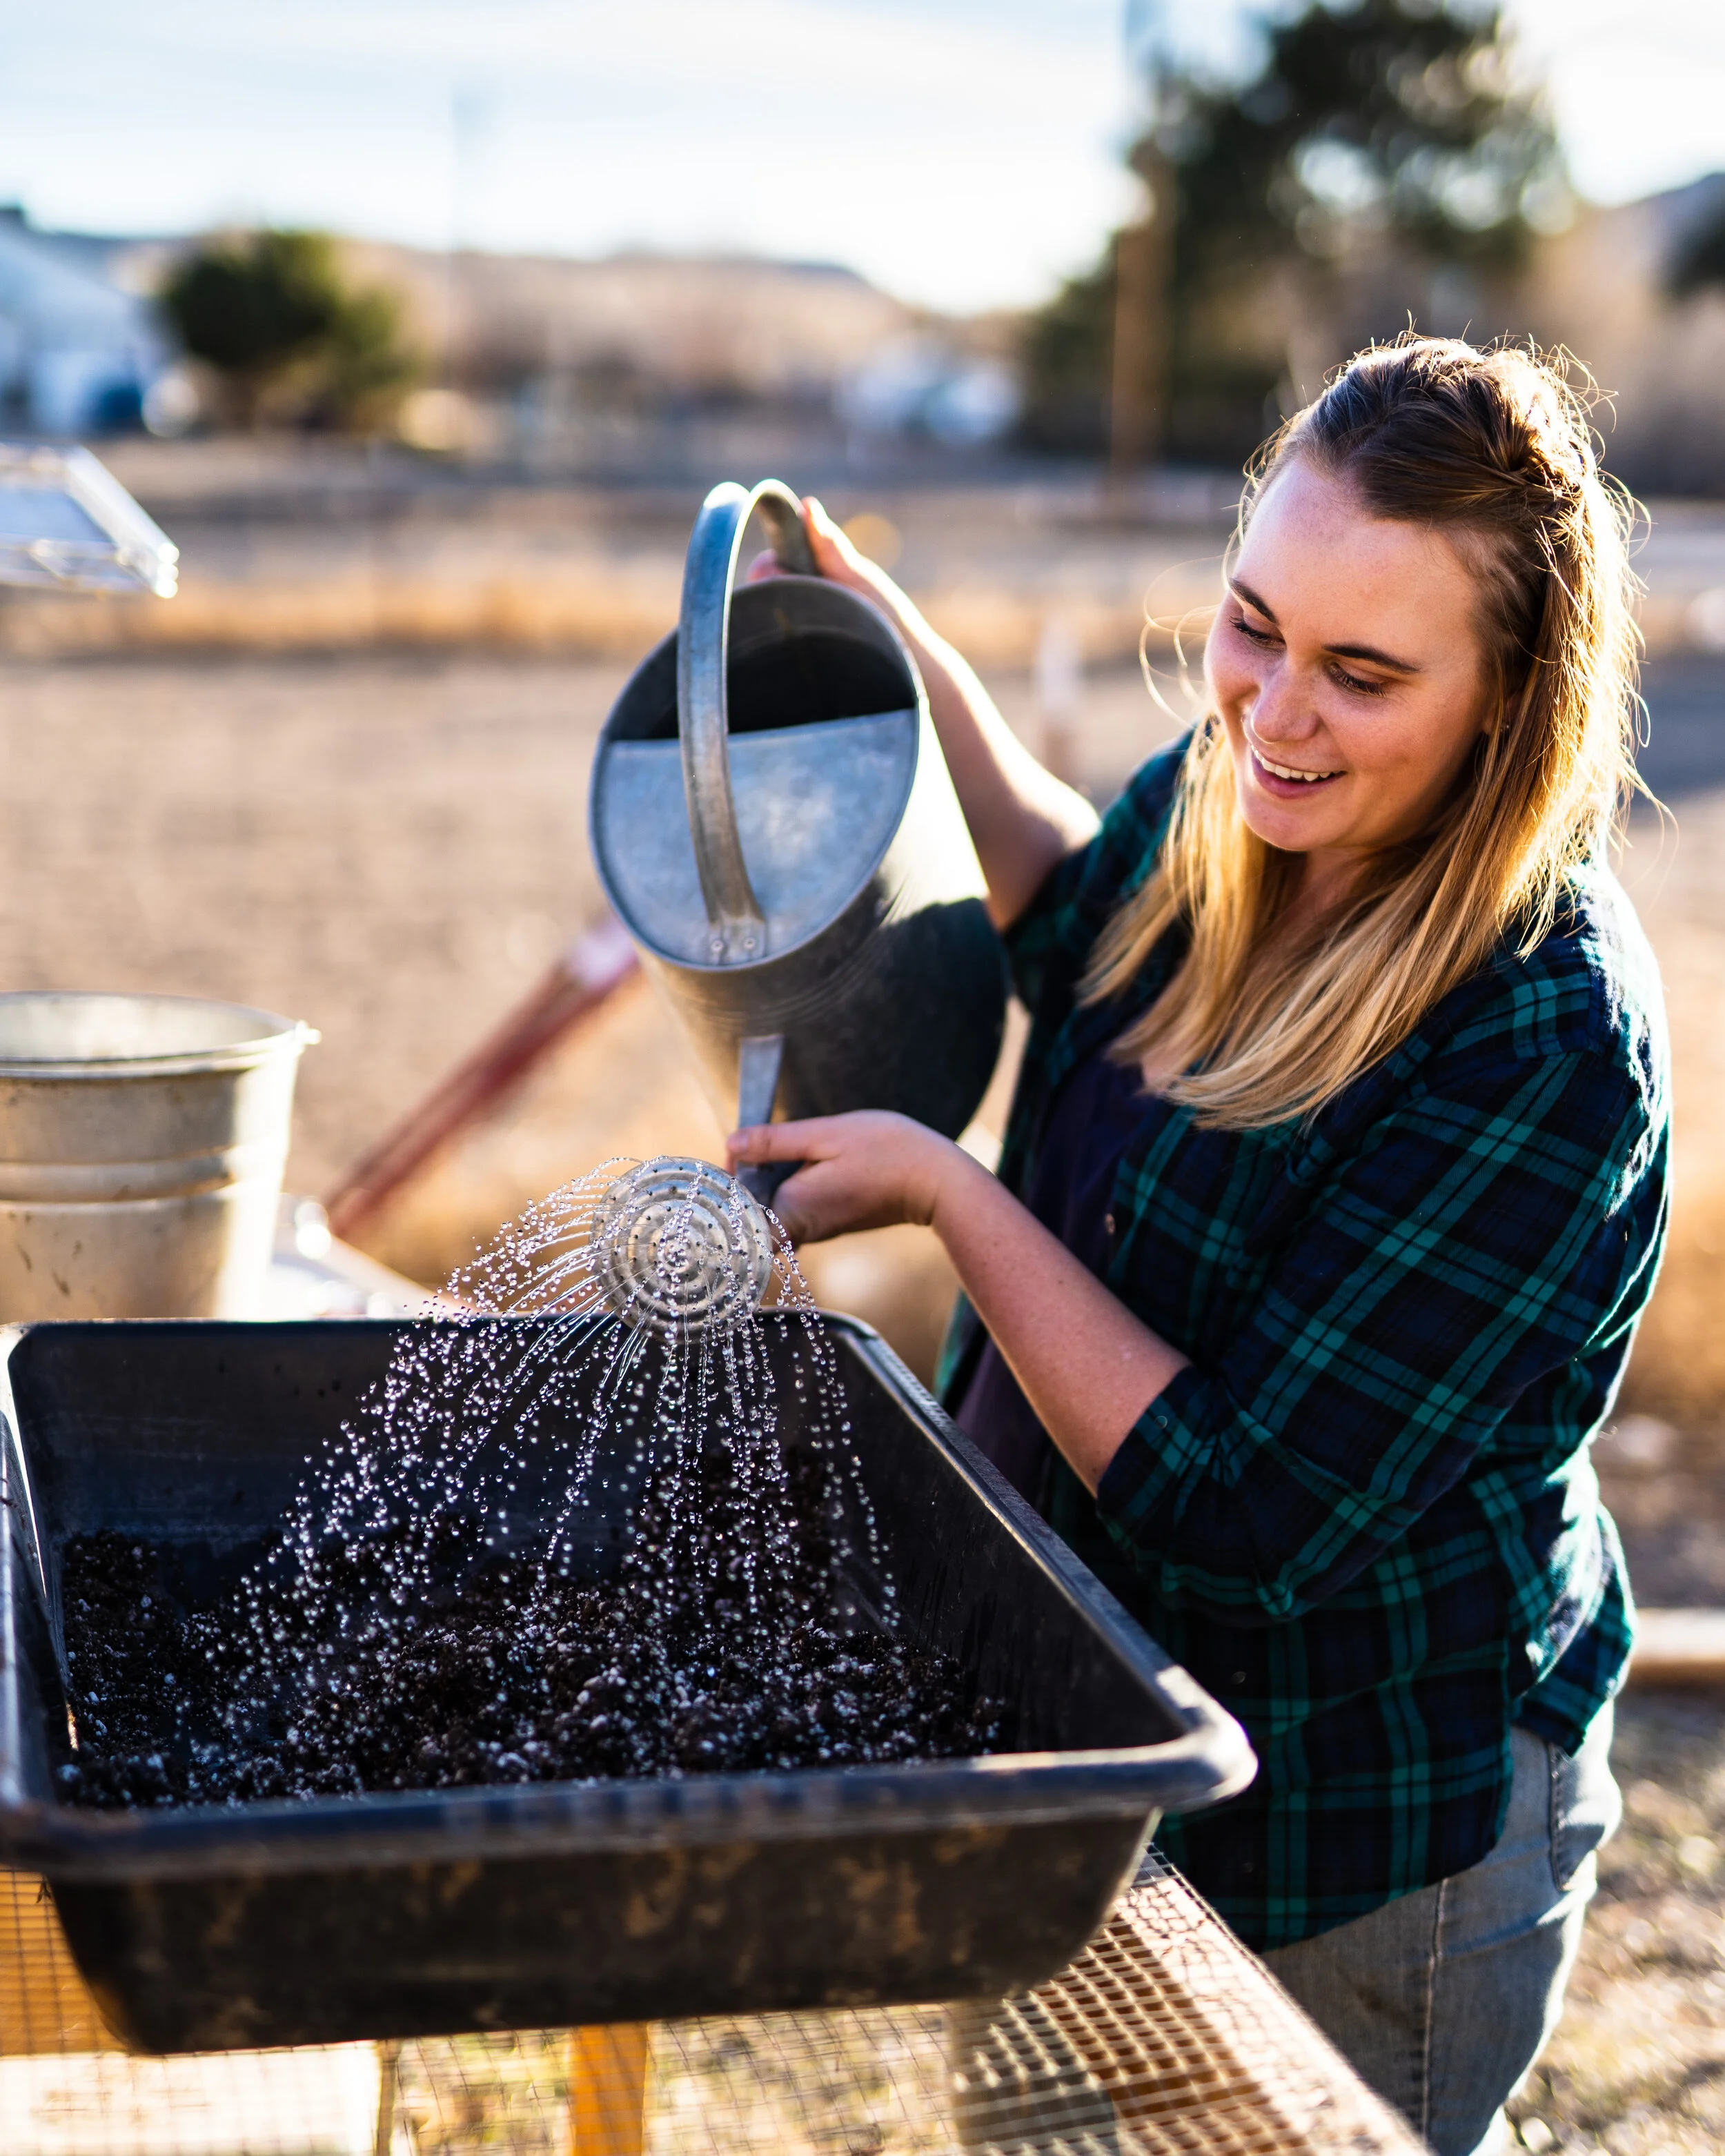
Soil blocks are made, now y'all continue to start your seeds equally normal. I similar the ¾" soil blocks for a majority of seeds. The 2" soil blocks are great for sweet peas and if y'all demand to bump upwardly your 3/4" soil blocks. Once you sow the seeds, don't push the seed into the soil block. It will most likely break the block, instead sprinkle some soil mix or vermiculite on top, depending on the seed'due south formation needs. Lesser water the soil blocks, but don't let them get soggy! If you overhead water, you risk the soil blocks crumbling. Once seedling has geminated and has a decent root base, then overhead water can be done (if desired).
It takes a little practice and watching to get watering down. Soil blocks are great at hanging onto water only if you let them dry out too much, they can be fussy to rehydrate (and your tender seedlings may dice a crispy death before you realize it). In the early stages of germination, I like to lightly mist the elevation of the soil blocks to keep the seeds hydrated. On warm, sunny days I bottom h2o. On days where it is cloudy and cold, I back off of watering. You tin utilize a heating mat or whatever organisation you adopt to use, but like using the bulb trays. To learn more well-nigh seed starting read our blog post Nitty Gritty: seed starting for the flower farmer.

When you encounter your seedling busting at the seams (literally) and so simply crash-land them up to the next size soil block or harden them off and transplant out every bit normal. The bang-up thing about soil blocks is that they are like matryoshka dolls, in that each size nestles nicely in the side by side size making for bumping upwardly crops a breeze. I realize the 3/four" may seem too tiny for planting out but rest assured they can handle information technology! Just brand sure to h2o them plenty for those first few days until their roots institute. So whether planting out or bumping up: the soil blockers have you covered!
Troubleshooting y'all soil block germination:
If you are seeing excess algae growth cut back on the watering and increase air apportionment.
If you are seeing that seedlings are getting crispy, y'all are under watering. Increase watering if seedling isn't too far gone or sow a fresh batch.
Some of my favorite varieties to use soil blocks for:
Though it's been quite a few seasons since making my first soil block and I now use a mixture of trays and soil blocking there are still a few varieties that I prefer to stick with the soil blocks for. Typically, if a diverseness is super picky about information technology'south roots being handled I prefer to soil cake those guys. If they like to be direct sown for optimal growth only reality does not encounter ideal, I soil cake those guys. Basically, cold hardy annuals seem to exist the bulk of the seeds that appreciate a soil block. To exist honest, I take yet to experience a seed that does not dearest the soil cake.
Examples of varieties that I adopt to soil block if I can't direct sow them out in the field:
bupleurum
bachelor buttons
cress
saponaria
larkspur
ammi/dara
nigella
chammomile
orach
grasses
Plus, overall, I like having my soil blockers equally back upwards if I run out of propagation trays! Between children, wind and a naughty puppy, I take definitely been using more soil blocks this season!

That's about it on soil blocking! If you are looking for a green alternative to plastic trays, or are looking to save space, soil blocking may be for you!
Having trouble figuring out when to seed outset?
Check out our video Demystifying When to Seed Outset, link below!

Until next fourth dimension, I hope y'all enjoyed the blog and I am looking forward to handing yous some blooms soon.
Jessica
SHAMELESS PLUG!
FLOWER FARMING BUSINESS
Flower farming is a journey. For all the dreamers and fellow bloom farmers, let'south get downwardly into the business side of flower farming!
To assist you on your soil blocking quest, here are some Amazon links to soil blockers:

rodriguezconem1977.blogspot.com
Source: https://www.sierraflowerfarm.com/blog/2018/3/18/nitty-gritty-soil-blocking
0 Response to "Lucky Dog K-9 Cube Growers Blend Soil Review"
Post a Comment